Swedish Cardamom Buns


If your first thoughts were: “this looks complicated”, then think again. Because once you read through the step by step guide below, you will be tying knots (albeit the dough kind) like a sailor. They are so much fun to make!

This recipe reminds me of the brioche loaves I made last year because of the light buttery texture of the bread. These buns take less than half the time it takes to make brioche and has a lot more flavour: I brought them into the office the next day and before I got back to my seat they were all gone!

Not all recipes use egg but I find adding it here helps give the dough a soft, cakey like texture that you expect from a cinnamon roll. I love the generous use of cardamom, one of my favourite spices. It was back breaking having to grind it by hand in a mortar and pestle; very few places sell the seeds grounded. Be generous with the spice measurements, about 1/4 of it will melt away in the baking process anyway.

And yes I have to admit I played around with the recipe - I added orange rind, nutmeg and almond essence to the mix. This is all optional.

Bon appetit!


Swedish Cardamom Buns

INGREDIENTS

CARDAMOM DOUGH

  • 1 cup + 1 Tbsp. (250 ml) milk, lukewarm temprature
  • 1 envelope dry active yeast (7 g)
  • 1 1/2 tsp almond essence
  • 1/3 cup (67 g) light brown sugar
  • 3 1/4 cup (406 g) all-purpose flour, plus more to flour surfaces
  • 1 tsp. ground cardamom seeds
  • 1/4 tsp. salt
  • 5 Tbsp. (75 g) butter (at room temperature)
  • Oil/cooking spray (to grease bowl)


CARDAMOM FILLING

  • 4-5 Tbsp. (about 63 g) unsalted butter (at room temperature)
  • 1/3 cup (65 g) dark brown sugar
  • 2 tbsp. ground cardamom seeds
  • 3 tbsp cinnamon powder
  • 1 tsp nutmeg
  • 3 tbsp freshly grated orange rind
  • 1 tsp almond essence


CARDAMOM GLAZE

  • 1 egg - whisked


CARDAMOM DOUGH

  1. Pre-grease/oil a large bowl and set aside.
  2. In a small bowl, add yeast to the lukewarm milk with 1 tsp. light brown sugar and stir until yeast has dissolved. Let activate for 10 minutes.
  3. Meanwhile, grind/crush cardamom seeds with spice grinder or mortar and pestle. In the bowl of your stand mixer, fitted with whisk attachment, mix together flour, light brown sugar (less 1 tsp.), cardamom, and salt.
  4. Change the attachment to the dough hook attachment.
  5. After yeast has been activated, add almond essence to your yeast/milk mixture, then add to the flour mixture and mix on low until dough begins to come together. Increase speed to medium-low and add cubed butter in handfuls. Once all the butter has been added, increase speed to medium/medium-high and knead for about 5 minutes. You want this to be a fairly loose dough, so whatever you do, don’t over knead.
  6. Scrape dough out onto a lightly floured surface and shape it into a bun, tucking the edges toward the centre.  Place in your greased bowl, seam side down and cover with a clean kitchen towel. Place bowl in a warm place and let it rise for at least 40 minutes.


CARDAMOM FILLING

  1. In the bowl combine butter, dark brown sugar, and freshly ground/crushed cardamom seeds and the remaining spices until creamy and smooth.


FORMING

  1. Line baking sheets with baking paper.
  2. Roll out dough into a 13” x 21” rectangle on a lightly floured surface.
  3. Spread filling onto the rolled out dough rectangle with a spatula so that it covers the entire area from edge to edge.

  1. Mark 7″ sections on the 21″ side with the back of a knife so that you have three equal sections. Fold left side to the middle, than fold the right side over the left side. Turn the dough so that the openings are on the left and right sides and roll out the dough slightly.

  1. Using your ruler and sharp knife or pastry wheel, cut 2 cm strands. You should have 15-20 strands.

  1. Starting from the end, wrap one strand around the tips of your thumb and four fingers (three if you have big hands) twice, twisting slightly as you wrap, then slip your thumb out of the roll, loop the strand around one last time then tuck the end and your thumb loop into the bottom. If you’re having trouble, please re-watch this link. Repeat with all strands.
  2. Place buns on your pre-lined baking sheets, (giving enough room for dough to rise and spread during proofing and baking), cover with a kitchen towel and let rise for about 30 minutes.

  1. While proofing, preheat oven to 435°F (at least 30 minutes before baking)


BAKE

  1. Brush the surface of each bun with the whisked egg
  2. Bake proofed rolls for 7-8 minutes or until tops are golden brown
  1. When they have cooled down completely, you add a dollop of orange infused cream cheese, (a mixure of orange peel, juice, icing sugar and cream cheese) to each bun.
  2. Serve and enjoy!!


Advertisement

Ethiopian Lentil Stew (Misir Wot)

If you can’t stand the heat, then you better stay out the Ethiopian Kitchen!

It’s not that Ethiopian food doesn’t have a range of mild flavoured dishes, they do, but pepper is so essential to the cuisine that to avoid it is to essentially ban yourself from the whole experience!

Ethiopian Cuisine: I haven’t tasted anything so lip-smackingly delicious in a good long time! I’m gonna be stuck on this for a while!

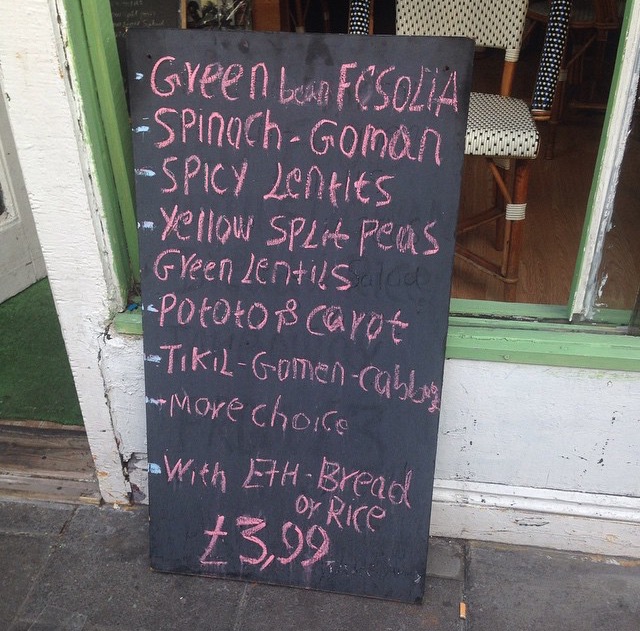
Ok admittedly the last time I tasted authentic Ethiopian cuisine was about a year ago where I just happened to walk by a small take away 5 minutes walk down Kingsland High Street in Dalston, London. They offer a selection of stews or ‘wots’ with a combination or rice or the infamous Injera bread, all for just £4!!

FullSizeRender (13)
Kingland High Street, Dalston, London

Many Ethiopian’s are Orthodox Christians who traditionally eat vegan on Wednesdays and Fridays, as well as other special days,  hence why there is such a wide selection of vegan/vegetarian Ethiopian dishes.

This recipe is adapted from the more classic Misir Wot, which literally means ‘lentil stew’; I have added sweet potato, coconut milk and spinach to this mix.

This is also my first time using my new found Ethiopian spice blend home made brebere which I made virtually a few minutes before assembling this dish. I didn’t taste the stew till the very end, and when I did, let me tell you I almost burnt my mouth going for a second helping, I was surprised! With such a wide range of spices all packed in one blend, I was expecting a bitter, confused taste, instead - pure harmony, I could taste everything, not overpowering at all. So step away scotch bonnet! There’s a new kid in town!

More Ethiopian dishes to come!


Ethiopian Lentil Stew (Misir Wot) 


INGREDIENTS

2 medium sized sweet potatoes - cut into chunks

1/2 white onion, sliced

2 large garlic cloves - crushed

1 tsp finger chopped fresh ginger

1 tbsp coconut oil - frying

1 1/4 cup green lentils - pre-cooked

1 tbsp Tomato Paste or 2 plum tomatoes (crushed) with a little juice

2 1/2 tsp of Homemade Berbere Spice

1 cup Coconut Milk

2 cups of boiling water

1 chicken or vegetable stock jelly

3-4 Pimento Seeds

1 generous handful of spinach


METHOD

  1. In a bowl dissolve the stock jelly in the 2 cups of hot water with the pimento seeds. Set aside.
  2. Soften the onions slowly in a deep pot with the coconut oil for 5-6 minutes
  3. Add the garlic and ginger - 2 minutes
  4. Stir in the berbere spice, take it off the fire to allow it to slowly cook
  5. Return the pot to the fire and add the tomatoes, allow it to reduce for 2 minutes, until the water has evaporated.
  6. Add the sweet potato and stir
  7. Add the lentils, stir (medium heat)
  8. Add the stock liquid, pimento seeds and coconut milk. Cover and allow to simmer for 10-5 minutes or until the sweet potato is tender
  9. Stir the spinach in at the end. Season to taste.
  10. Serve with rice


Raspberry Cheesecake Brownie


Someone once said that the best things in life come in threes like friends, dreams and memories. I would like to stick this cake at the end of that quote, because the three layers that make up this sweet sandwich will be a close memory I hope to never wake up from.

This cake has something for everyone: when I brought this cake into work Monday morning, the winning layer appeared to be the soufflé type raspberry cream topping. Others favoured the dense texture of the brownie and a small minority enjoyed the fluffy and  slight saltiness of the layer of cheesecake.

My eyes are immediately drawn to the creamy top if I’m honest; I’m not one for things being symmetrical and in order, but I have to say I love how the contrasting textures hold together forming this perfectly layered square.  I was a little nervous baking the brownie and the cheesecake together,  fearing one would bleed into the other forming some kind of marble effect. But as long as you keep the cake in the fridge, the cream will keep on top of the cake and keep its shape for a good 6 hours.


Rasberry Cheesecake Brownie

  • Servings: 12
  • Difficulty: easy
  • Print


Ingredients:

For the Brownie 

200g Sainsbury’s Belgian dark chocolate chips

200g unsalted butter (softened)

250g icing sugar

3 eggs

110g plain flour


For the Cheesecake

400g cream cheese

150g icing sugar

1 tsp vanilla extract

2 eggs


For the Cream topping

300 ml whipping cream

100g icing sugar

1/2 tsp vanilla extract

150g  fresh raspberries, plus extra to decorate


For the brownie:

Preheat the oven to 170°C (or Gas mark 5)

Put the chocolate in a heatproof bowl over a pan of simmering water (do not let the base of the bowl touch the water). Stir occasionally until the chocolate is  melted.

Put the butter and sugar in a bowl and with a spoon or electric whisk beat until you have a fluffy light cream.

Add the eggs one at a time, mixing well.

Gradually beat in the flour until you get a smooth mixture. Do this for about 2 minutes on high speed with an electric whisk.

Slowly pour in the melted chocolate and mix thoroughly. Pour into the prepared baking tray and smooth over with a palette knife.


For the cheesecake:

Put the cream cheese, sugar and vanilla extract in a bowl and mix until smooth and thick. Add one egg at a time, while still mixing. The mixture should be very smooth and creamy.

For a little lighter and fluffier mixture, beat the cream at high speed for 1 minute with an electric or manual whisk, but be careful not to over-mix, otherwise the cheese will split. Spoon on top of the brownie and smooth over with a palette knife.

Bake in the preheated oven for 30–40 minutes, or until the cheesecake is firm to the touch and light golden around the edges. The centre should still be pale. Leave to cool completely, then cover and refrigerate for 2 hours at least.

For the cream topping:

Put the cream, sugar and in a bowl and whisk or beat until firm but not stiff.

Mince up the raspberries with a fork (keeping 12 or so back for decoration) and stir into the cream.

Turn the brownie out onto a board and turn the right way up.

Spread the topping evenly over the brownie, cut into portions and decorate with more raspberries.

Adapted from the  Humming Bird Bakery Cookbook 


Green Fig Salad


It was only during my first trip to Trinidad as a teenager that I realised the sheer variety of bananas that existed. Most of us are familiar with the Chiquito variety of medium sized bananas and a few more with yellow plantain and even green banana. But Trinidad introduced to me red skin banana, sour tasting banana, short fig and cooking fig. I think I’ll work with the 3 I know for now.

This recipe is a typical alternative to potato salad in Trinidad. The firm starchy texture of the green banana makes it a usual candidate for  Metemgee; but it works really well in this salad as it resembles the waxy texture of new potatoes.  It’s also packed with vitamin C, B6 and Potassium, so don’t feel guilty serving yourself a larger portion.

Green Fig Salad

  • Servings: 2
  • Difficulty: easy
  • Print


Ingredients:

3 Green bananas

3 tbsp Garlic Mayonnaise

1/2 carrot cut into cubes

2 tbsp frozen peas

1 tsp English Mustard (optional)


Method:

Cut the banana into thirds with skin still on and boil in a pot of salted water for 15 minute or until firm. Remove from the stove, drain the water, replace with cold water to help it to cool down.

In the meantime take the carrot and boil in some water in a pot until tender. Drain water.

Take each of the banana pieces, remove the skin, slice down the middle then into chunks (1″ pieces). Place in a bowl with the carrots, peas and mayonnaise. Mix well, season to taste and serve.


XinXim (de Galinha)

Brazil is infamous for three things: Football, Carnival and Cuisine. I forgave them for their disappointing yet memorable defeat at the World Cup when I discovered their champion dish whilst dining in Las Iguanas during the football season.  Apparently one of Pele’s favourite dishes, Xinxim is a chicken stew which captures all that Brazil represents: a blend of  Portuguese, African and native Latin American Indian flavours. The marinated pieces of chicken are quickly browned and then cooked in this marvellously delicious thick rich sauce which is a combination of nuts and one key ingredient: Palm Oil.

Palm ‘fruit’ oil (as opposed to palm kernel which does not carry the same health benefits) is now sold in most supermarkets, and is commonly used in West African recipes from what I have tasted. I was surprised to find its distinguishing rusty red colour and mild fruity taste makes it healthier than olive, avocado or even coconut oil. Its colour is attributed to its high carotene content, the same antioxidant that gives tomatoes and carrots their rich red and orange colour. Palm oil is very high in vitamin E also.

My version of this recipe is made without crayfish as I don’t eat seafood, but you can still enjoy this rich stew with a side of fried plantain and rice.

XinXim

Ingredients

1 KG of Chicken thighs (de-boned and cut into medium pieces) or breast

1/3 cup palm oil

1/3 cup roasted peanuts

1/3 cup of cashew nuts

1/3 bunch chopped Coriander

1 tbsp spoon of grated ginger

1/2 tsp ground black pepper

3 cloves garlic

1 large onion - finely chopped

1 Tbsp of lime juice

1 Can of coconut milk

1 whole scotch bonnet

salt to season

Method

1. Cut the chicken into medium chunks, clean and marinate (in a combination of lime juice, salt, black pepper, salt, dried thyme, paprika, grated onion, garlic) overnight or at least 3 hours.

2. In a large saucepan, heat the palm oil and cook the chicken pieces for about 25 minutes, stirring occasionally

3. In a blender add cashew nuts, peanuts, ginger and garlic. Blend it into a rough paste and add it to the chicken with the whole scotch bonnet pepper.

4. Cook over medium heat for a further 10 minutes, if the paste gets too dry, add some water

5. Add the coconut milk and simmer for another 15 min.

6. Serve with garlic and lime rice and a side of fried plantain

Nutritional value of 1 serving of XinXim

1 bowl
Calories(Calories from fat) 256
Sodium 148 mg
Total Fat 10 g
Potassium -
Saturated Fat  4 g
Total Carbs -
Polyunsaturated  1 g
Dietary Fibre 1 g
Monounsaturated  2 g
Sugars -
Protein 29 g
Vitamin A -
Calcium -
Vitamin C -
Iron 5% -

*Percent Daily Values are based on a 2000 calorie diet. Your daily values may be higher or lower depending on your calorie needs.

Guyanese: Pine Tarts

A friend of mine ‘returned home’ to get married in Guyana and a couple of our mutual friends joined her for the experience. For most of them, this was their first trip to Guyana; although of Caribbean descent themselves, I had to admit I was slightly nervous for them as Guyana is a very different experience to say Jamaica and Trinidad and so I was interested to hear their take on the country, especially as I hadn’t seen the country for over 10 years myself.

They all came back smiling I am pleased to say, not only for our friend whose wedding was beautiful and heart warming, but also for the love of the country. “Those Pine Tarts were so amazing!” recalled one of my friends, also the Chief Bridesmaid at the wedding. “And although I don’t eat a lot of meat, I really enjoyed the pepperpot stew”.

I was curious to hear how much Guyana had really developed since I last visited. When I was there, it felt very rural yet lively with friendly, approachable people and social events that brought out the whole community. But those Pine Tarts, yes I had to agree, are pretty good. My mother use to make these during the summer holidays once the school term was done and would sometimes pack them into our bags for summer play-scheme.

Pine tarts a very easy to make with either fresh or canned pineapple. The sweet pastry really holds the filling together and tastes just as good as the jam inside. So if you have time during the summer holidays, I would recommend setting aside an hour or two to make some of these tarts for the family. You won’t regret it.

Guyanese: Pine Tarts

  • Servings: 6
  • Difficulty: easy
  • Print

Ingredients: 

For the Pineapple Filling

425g Pineapple Chunks (or fresh pineapple chunks)

3/4 cup granulated sugar

1/4 tsp cinnamon powder

1/4 tsp ginger powder

1/4 tsp grated nutmeg

1/2 tsp Vanilla essence

For the Pastry

1/2 cup salted butter (soft)

1/2 cup of vegetable shortening

2 3/4 cups plain flour

2 tsp sugar

pinch of salt

1 egg (egg wash)

3/4 cup ice cold water

Method

The filling

1. If you are using fresh pineapple, then peel and cut the pineapple into large chunks and transfer into a food blender, pulsate for a minute until you have small lumps. You want to then measure out 2 1/2 cups of pineapple from that to use in the filling.

2. If using pineapple from a can, take the fruit and half of the juice and pulsate in the blender until you have small lumps.

3. Place the fruit into a sauce pan with the remaining juice and the spices and sugar. Simmer slowly for 30 mins under a low to medium heat or until the mixture thickens to a jam like consistency. Keep stirring regularly to avoid it burning. When ready, remove from the heat and set aside to cool down completely.

The dough

4. Place the flour, butter, salt and sugar in a bowl and mix together until it forms a crumbly texture. Then little by little, add the cold water until you can form a dough. Knead the dough to a  smooth log (about a foot long), wrap in cling film and refrigerate for between 30 minutes and 4 hours before use. When you are ready to use it, leave the dough out the fridge for about 30 minutes to get to room temperature.

The assembly

5. Cut the log into 1 inch thick rounds, flour your work surface and roll the dough out into a 6″ circle (I used a plate).

6. Place 1 1/2 tablespoon of pineapple filling into the middle of the circle and brush the edges with egg wash.

7. Fold the corners of the dough into the middle, to form a triangle. ensure the ends are sealed, you can use a fork to do this.

8. Brush the top with egg wash and sprinkle with sugar (optional)

9. Bake in the oven (Gas Mark 5) for 20 minutes or until golden brown.

10. Serve hot or cold.

Spiced Walnut Butter


If your anything like me, walnuts haven’t rated too highly on my ‘nut list’ either. But did you know that walnuts have the highest amount of omega 3- fatty acid of any nut? In other words it’s the all round hair, skin and nail food. Now does it sound a bit more appealing? Ok well I tried.

I still believe the walnut has the right to be released from the prison of banana breads and festive nut trail mixes; it has a hugely bold even bitter flavour, I agree, but when combined with sweet cinnamon and nutmeg, it seems to mellow down to a smooth pecan like taste. I say make the most of that trail mix and create the most irresistible butter you would have ever tasted. I’ve been enjoying it all week and feeling good!

This recipe can keep for up to 2 weeks if stored in an air tight glass jar in the fridge. This recipe makes just over a cup of walnut butter. Enjoy!


Spiced Walnut Butter

Ingredients

3 cups of raw walnuts
pinch of salt
40 mls Maple Syrup
1 tsp vanilla extract
1/4 tsp ginger powder
1/2 tsp cinnamon
1/2 tsp grated nutmeg
2-3 tsp liquid coconut oil

Method

Pre-heat the oven to Gas Mark 4 (350F). Place the walnuts on a baking tray and toast in the oven for 5-7 minutes. Watch them carefully as you don’t want them to go brown. Set aside to cool.

In a food processor, place the other ingredients and add the walnuts. Blend on a high speed until you have the consistency you want: crunchy or smooth butter. Taste the mixture and add more syrup or spice if desired.

Serve with warm toast or bagels.

Nutritional value of Spiced Walnut Butter.

Spiced Walnut Butter(2 tbsp)
Calories(Calories from fat) 258
Sodium 2 g
Total Fat 19 g
Potassium 42.8 mg
Saturated Fat 2 g
Total Carbs 17.4 g
Polyunsaturated 2 g
Dietary Fibre 3.2 g
Monounsaturated 3 g
Sugars 11.9 g
Protein 5 g
Zinc 5.5%
Calcium 4.8%
Manganese 33%
Iron 5% 9.3%

*Percent Daily Values are based on a 2000 calorie diet. Your daily values may be higher or lower depending on your calorie needs.

Vanilla Cardamom infused Mango w/ Honeyed Greek Yoghurt


Greek Yoghurt has become my new obsession, especially now that I appreciate its health benefits a bit more. I have always been a lover of yoghurts: my family of 6 was split cleanly down the middle; 3 gulped it down by the gallons, the others couldn’t care less.

I experimented with soya yoghurts and even coconut ones for a while, the latter tasting mega delicious, but at £3 a small pot I couldn’t sustain it for too long. Maybe I’ll experiment a little with making my own…who knows. But in the meantime, this recipe works just fine. If you want to preserve some of the nutrition from the mangoes, you might only want to poach it gently, remove the fruit and then allow the liquid to simmer to a syrup like consistency.


Vanilla Cardamom infused Mango w/ Honeyed Greek Yoghurt


Ingredients:

1 Ripe Mangoes - cut into large chunks (1 cups)

1 tbsp honey

1 Vanilla Pod

1 cup water

1 cardamom pod - crushed


1 cup Greek yoghurt

1 tbsp honey


Method

Take the yoghurt and honey, blend together and set aside or place in the fridge to keep cool.

Take the remainder of the ingredients and place them in a pot. Simmer the fruit for 8-10 minutes. You can remove the fruit after 3 minutes to allow the liquid to thicken. Once you have the desired consistency remove the cardamom pod and transfer the fruit to a bowl to cool before serving with the yoghurt.


Nutritional Value of Mango w/ Honeyed Greek Yoghurt

Mango Greek Yoghurt Honey(2 tbsp)
Calories(Calories from fat) 107 100 120
Sodium 3 mg 65 mg 1 mg
Total Fat - - -
Potassium 257 mg - -
Saturated Fat - - -
Total Carbs 28 g 7 g 17 g
Polyunsaturated - - -
Dietary Fiber 3 g - -
Monounsaturated - - -
Sugars 24 g 7 g 16 g
Protein 1 g 18 g -
Vitamin A 25% - -
Calcium 2% 20% -
Vitamin C 76% - -
Iron 5% 1% - -

*Percent Daily Values are based on a 2000 calorie diet. Your daily values may be higher or lower depending on your calorie needs.


Coconut Lentils w/ Honey Roasted Salmon


It’s with sadness that I have to announce that this recipe will be the final act in the ‘Beat the Bloat’ series. It’s been really special guys, I have loved the research and creating these recipes, I have learnt so much about correct food combinations and clean eating, all without losing out on taste and all within a reasonable budget.

I am working on some other food projects even as we speak, so if you don’t hear from me in the next few days it’s because I’m planning and experimenting away! All of these recipes have many more benefits to your health and well-being more than simply getting into those pair of jeans you bought a year ago, although that has its place too!

I hope the recipes have more than just inspired you…what would be truly amazing is if you tried making one of them and really liked it -  a lot! That would bring a smile to my face, your tummy would also be happy too!


Honey roasted salmon. I love smoked honey roasted salmon and there is always a way to artificially re-create that flavour; but I didn’t want to add too many artificial condiments to this recipe.

I love the colour and texture of this dish, it really is one for sharing. Be sure not to over cook the salmon; make it the last thing that you cook and try not to re-heat it, otherwise it tastes all chewy.

Then bask in the sunshine on your plate and enjoy a fork full of honey roasted goodness…until next time!


Coconut Lentils w/ Honey Roasted Salmon

Ingredients

For the Salmon:

2 Salmon fillets

Thumb size piece of fresh ginger (finely grated)

1 Tbsp Honey

Juice of half a lime

1 tsp Old Bay Seasoning

1 tbsp Soya Sauce

1/2 tsp black pepper

1/2 Himalayan Pink Salt

2 garlic cloves crushed

1/4 white onion (finely grated)


For the Lentils:

1 cup Puy Lentils

3 cups water

1 vegetable stock cube/ jelly

1/4 Scotch bonnet pepper

1/2 tbsp Curry paste

1/2 Onion finely chopped

2 garlic cloves crushed

1 tsp tomato paste

1 tbsp of coconut cream (from a solid block) or 2 tbsp of coconut milk

Pinch of salt

2 Kaffir leaves


For the Roasted Vegetables:

2 Sweet Peppers (one red, yellow)

1/2 White Onion

1 garlic crushed

5 Chestnut Brown Mushrooms (cut into quarters)

3 sprigs of fresh thyme

1 carrot cut into chunks

Pinch of salt

2 tbsp of Olive Oil.


Handful of Kale (steamed)


Method

Preparation:

Pre-heat the Oven (Gas Mark 6)

1. Chop up the vegetables for roasting (excluding the Kale and peppers) and place them in a bowl (without the oil).

2. Prepare the marinade for the Salmon. Once you have cleaned the fish marinade it with the seasoning and transfer to the fridge.


Cooking:

3. Take the Lentils, water and vegetable stock and transfer to a pot. Bring the pot to a boil and then simmer for 20-5 mins until the water is reduced and the lentils are firm but cooked.

4. You may roast the sweet peppers with the other vegetables or you can do so over an open flame as I did: take each of the peppers and rest it over a open flame on the cooker, turning the pepper as the skin begins to blacken.

5. When you have finished the first pepper, transfer it to a sealed container (or bowl with a plate over it), the steam will help to soften the skin to make it easier to peel off. Do the same with the second one.

6. Now take the baking tray to roast the vegetables in, add the oil and garlic and transfer to the hot oven. Bring out the tray when the pan is heated, you should be able to add the vegetables to a sizzling pan and return it to the oven for 10 minutes. Near the end, you can add the peppers so that all the flavours from the vegetables are soaked up.

7. When the lentils are cooked, take a separate pot and fry the onions, garlic, pepper and curry paste. Then add the tomato paste and stir for 1 minute.

8. Then straining the lentils but keeping the water, transfer the lentils to the pot of onions and stir adding all the lentils in and stirring completely.

9. Then add the water from the lentils and coconut milk. Season to taste and simmer for 5 minutes leaving a little sauce in the stew.

10. Take the vegetables out the oven and throw in the Salmon for 10 minutes or until the salmon is cooked.

11. To steam the Kale, simply place it on top of the lentil stew and cover with the pot cover; the steam from the lentils will cook the Kale - it should be a nice bright green and slightly firm.


Plate up:

12. Place the Kale on the plate first with a sprinkle of lentils, then add some of the roasted vegetables and keep layering. Then flake the Salmon on top of the plate.